Monday, January 25, 2021

HO Engine Availability 

An interest has been expressed in knowing what type of ready-to-run (rtr) HO scale engines are/were available. What follows is my list. I do not purport or imply this is an exhaustive list. For example, I have several brass 4-4-0s of unknown origin packed in my boxes. It also does not include the fine conversion kits offered through Shapeways online vendors such as Gerry's Early Rail Models, Russel Likes Trains, etc. It also does not cover motive power available in either O or N scales. I will add additional photos when I can unpack and photograph my engines currently in storage.

As always, click on the images to enlarge.

Mantua/Tyco General
    Zamac/white/pot metal boiler & cab with metal tender
    Tender Drive
    DC powered
    Springs on pilot truck often go bad
    Different drivers offered over the years, some see through and 
        some solid castings
    Different tender frames offered over the years as well
    Available as both rtr and kits
    Used units currently common through eBay online auctions
    Company was purchased by Model Power and is now owned by
        Lionel. Future availability not known.


Bachmann Jupiter
  
    Plastic bodies & tenders on both original & new tooling
    Original Tooling
        Originally part of their Centennial "set" but with units sold
            separately 
        DC powered only
        Tender Drive
        Nicer cow catcher
        Available over the years in different starter sets such as the
               Union and Confederate starter sets pictured below.  


    New Tooling
        Motor in Engine
        DCC Ready & DCC versions
        Ugly front couplers
        So far, the 3 I have have run nicely right out of the box
        Decoders have limited functions, good bell sound, not so much 
            with the anemic whistle sound


Pocher/AHM/Rivarossi/IHC/Mehano 4-4-0
    Plastic
    Numerous road names over the years
    Different versions offered (same body but with different stacks and
        tender loads)
    Tender Drive
    DC powered
    Actually larger than HO scale, more like OO scale & have been
        used extensively with 1/72nd scale figures
    Work fine if you are planning to use Mantua or Bachmann early 
        "Civil War era" rolling stock.
    Mine have been more reliable runners than the either Mantua or
        Bachmann engines


    Be careful of oversized European style wheel flanges on some models as seen below!!!! These can cause problems even if you are using code 100 track.


Pocher/Rivarossi 2-4-0
    Plastic shells & tenders
    Motor in engine or tender. I have one with the motor in the engine
        rather than the tender. I bought it new so it is not a conversion.
        The ones offered on eBay seem to be mostly tender drive.
    DC powered
    Be careful of European style wheel flanges on some models 
        originally from overseas' markets.


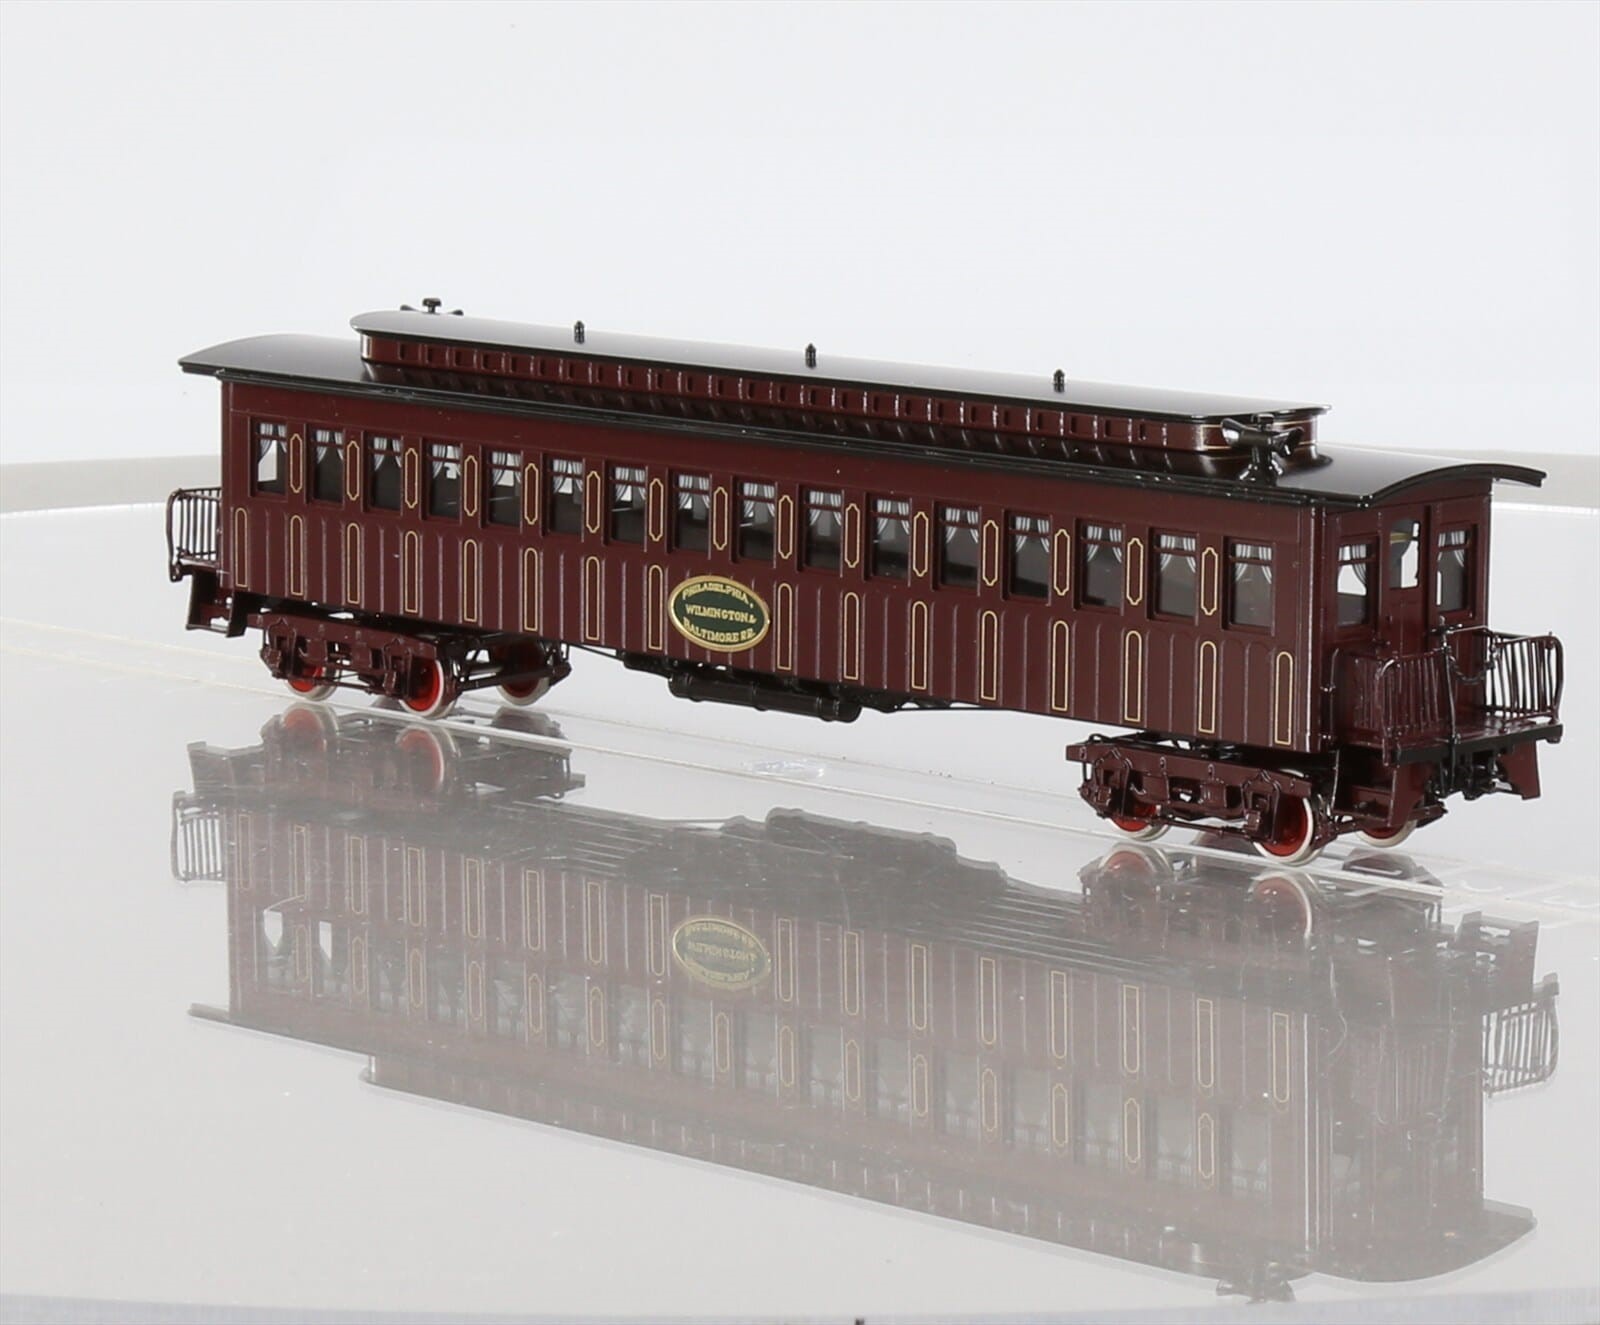
Iron Horse Models/Precision Scale Company (PSC) Lincoln
    Funeral Train
    Brass collectors set which includes the engine Nashville, the
    Lincoln funeral car, and a matching Philadelphia, Wilmington, & 
    Baltimore RR coach.
    DC powered
    Simply the best, most accurate!!!!!


Gem 4-4-0 William Crooks
    Brass
    Tender Drive
    DC powered
    Needs a lot of weight added
    Gem also made a matching coach & baggage car


Key Imports/Samhongsa 4-2-4 C.P. Huntington
    Brass
    DC powered
    Offered factory painted or plain brass finish

Factory Paint Job:

Purchaser paint job of how engine looked in later years:

M.B. Austin 4-2-4 C.P. Huntington
    Brass
    DC powered
    Not true HO scale/over sized
    Crude detail compared with Samhongsa offering. I had 2 and sold
        them both. Sorry I do not have a side-by-side comparison photo
        so you can see how oversized this engine actually is.


Fomras 4-2-4 Inspection Engine Star
    Brass
    DC powered
    Actually post Civil War but it looks so cool
    Based on CRR of NJ prototype (built date?) Drawing is from an
        1871 book.


Akane 4-4-0 Texas
    Brass
    Tender drive
    DC powered
    3 Domes
    Used to be available through Wm. K. Walthers' Catalog
    Occasionally available on eBay now


Choo Choo Stop 0-4-0 Cattawissa
    Brass
    Motor in Engine
    DC powered
    An inside connected style engine
    Originally offered in both plain brass & factory painted
    Plain brass versions are all I have ever seen
    Prototype "never" had a tender but see image below.


    Note lack of traditional tender.


PFM/United V&T 4-4-0 Reno
    Brass
    Large for HO Scale
    Tender Drive
    DC powered


PFM/United 4-4-0 Jupiter
    Brass
    Part of the Golden Spike Centennial set
    Motor in engine
    DC powered
    Large for HO scale but a beauty to gaze upon


Kemtron/Precision Scale C&NW Pioneer 4-2-0
    Brass
    Unpowered
    Extremely Rare
    PSC offers some, but not all, of the necessary parts to build one in
        their catalog as of January 25, 2021.

Balboa 4-4-0 Jupiter
    Brass (model below has been painted)
    Part of their Golden Spike Centennial set
    Motor in engine
    DC powered
    Allegedly poorer runner than PFM version. I have no experience 
        with this engine


FED (Far East Distributors) Spartan Series 4-4-0
    Brass
    Tender Drive
    DC powered
    Tend to be noisy
    Circa 1880s prototype
    Designed to be detailed/modified
    HO and HOn3 versions produced
    I have seen/purchased these on eBay from time to time


Aristocraft/Nu (New) One Model
    Different 0-4-0s, 2-6-0s, etc. offered
    Zamac/White/Pot metal boilers, cabs & tenders
    DC powered
    Crude details
    Grossly oversized
    Poor runners
    Castings tend to disintegrate/deteriorate
    The 2-6-0 pictured below is labeled as "Civil War Era." It is not.

Ken Kidder Porter Mogul 2-6-0
    Brass
    DC powered
    Motor in engine
    Has been available through several different importers over the 
        years.
    This is a post Civil War engine but offers possibilities to convert it 
        to either a 4-6-0 or an 0-6-0 which were wheel arrangements 
        seen during the Civil War. See John White's book for examples 
        of 0-6-0s in operation during the Civil War.
    Mine have all been good runners. I have begun to convert one to 
        an 0-6-0 but need to finish the train room project & reclaim my
        hobby work station before I can resume conversion.


Thursday, January 14, 2021

Ventilated Box Car:

My online group, the American Civil War Rail Road Historical Society (ACWRRHS),  will begin a "group build" in a few weeks. A group build is not a contest. There are no awards or prizes and the rewards are the experience, comradery, and the sharing with others. It is an online event where each member who chooses to participate builds a specific type of model. All skill levels are encouraged to participate. The build is not limited to any particular scale. Models can be simply repainted & decaled, super detailed, kit built, kit bashed, scratchbuilt, or some combination of thereof. Materials used are at the builder's sole discretion. If someone chooses to use popsicle sticks or old newspaper that is their prerogative. The build will be over the course of 2 months with each participant starting an online thread of their progress on our Groups.io web site. The main requirement is that the threads must document a current project and not one previously constructed. We have decided that our 1st build will be a Civil War era box car. Now, I have super detailed, kit built, kit bashed, and scratch built well over 100 pieces of rolling stock but, unfortunately, because of the ongoing work preparing my train room I am unable to access my hobby materials for this worthwhile endeavor. So, since I do still have access to my computer, I thought I'd post an article on a ventilated box car project I did back in 2004. What follows is a photo essay of what I did. I wish I had been more diligent in photographically documenting what I did back then but I did learn a lesson: document! Currently, I document each car (or series of cars) I build in a journal. This helps when I try to replicate what I did and what supplies I need before I begin a project. A life lesson well learned.

This is the starting point of the project, an IHC ventilated box car.


The IHC car is longer, taller, and wider than one you would typically find during the Civil War but I hesitated to undertake scratchbuilding a ventilated box car because of the vents on the sides. Instead, I decided to convert the IHC car following C.F. Ward Jr.'s article in the March, 1969 issue of Model Railroader in which he describes and gives drawings of 6 Civil War era pieces of rolling stock. The article gave certain critical dimensions for the cars. I focused on the specs for the standard box/house car used by the USMRR in the Eastern theater of the War with the goal of matching as closely as possible these dimensional parameters.


I have never been a fan of cast-on grab irons. Ditto for the cast-on brake chain. As you can see above, the brake wheel is oversized and the manner in which the car body is attached to the deck gives the car a toy like appearance. Please also note the metal truck pedestals and oversized truss rods & queen posts in the photo below. Very annoying to me.


My 1st step was deciding on what parts I would need for the conversion. I chose to replace the cars doors that came with the model and substitute Grandt Line (now San Juan Models) D&RG Stock Car Doors. I accumulated a small supply of these Grandt Line doors in order to finish converting (it still has to be done) the remainder of the IHC cars I have but now think I will reuse the original doors from the model instead. My modeling skills have (I think & hope I am not delusional) improved over the years so I think I can now sand the doors down to a more prototypical thickness. 

I also used 3" queen posts, stirrup steps, and nut/bolt/washer castings from Grandt Line. The turnbuckles are from Tichy Train. To replace the truss roads, I used light weight monofilament fishing line. You can buy a life time plus supply of this line at Walmart or a similar store. When I am able to again access my modeling supplies I can post the actual weight of the line but I used the thinnest I could find. I have also found that Bill over at BTS gives you enough line in every one of his kits to do several cars. Life is indeed good. I used Westerfield 18" grab irons. I replaced the original couplers with link & pin couplers from Keyport Car and Foundry because they were a drop in replacement for the IHC horn hook couplers. The Keyport couplers I  originally installed have subsequently been switched over to link & pin couplers from San Juan models because the latter are closer to scale. I also used a pawl modified from a Tichy Train brake wheel set and a brass brake wheel from BTS. The BTS brake wheels are the finest I have ever found, surpassing even those from the defunct Kemtron company and those available through Precision Scale. I always have a supply of Evergreen Styrene on hand for such projects, including scrap leftovers from previous modeling, and this supply certainly came in handy for this build.


Next, I carefully disassembled the model using a screw driver and hobby/Exacto knife with a #11 blade as seen in the following image.

I made sure to bag up the unused parts.


Cutting the car apart was next. I used the hobby knife and a razor saw to do this. Now days I would use a mini table saw. I was able to buy a used one on eBay for around $100 a few years ago.


I then cut the 2 long sides into sections using a square and a #11 blade. My measurement for cutting were the inscribed lines in the car side: 3 boards in from each end and  5 boards from each side of the door opening.


As you can see below, this allows me to shorten the car to a more prototypical length and eliminate the offending cast on grab irons. The image below shows how the car sides will be reassembled. The parts pictured below the "car body to be" went into the scrap parts box. In reassembling, I use a straight edge along the bottom edge to keep the pieces aligned. I used the bottom edge because the top was comparatively rough as a result of my original cutting the car apart.


To reduce the height of the car sides, I first glued on a trim piece of .01" x .04" (or scale 1"x4") Evergreen Styrene using the top of the 2nd vent opening from the top as my guide mark. When this was dry, I used the Exacto knife to cut off the portion of the car above this trim piece and then lightly sanded the top smooth on a sheet of 100 grit sand paper taped to the top of a piece of plate glass. I will post images of my sanding plate at a later date after I can access it again. I didn't think to take a photo of it at the time and at the moment it is packed away.


When it came to the ends, I decided to make new ones out of Evergreen styrene. Evergreen makes V groove siding in a number of board widths. At the moment I cannot remember the exact width I used (I will update this post when I can access my modeling supplies again.) but the board width matches that of the boards on the original model. 

I have a metal template I made to ensure the uniformity of scratch built USMRR rolling stock (photo pending, my excuse is still the same). I glued these pieces back-to-back with the cutoff pieces of the original model. Then I glued on an end beam made from styrene. After this was dry, I filed the resulting piece to match the arch of the template as seen below. The template sits on top of the end beam and this makes sanding the curve easier because the template doesn't shift as easily.

Because butt joints are not very strong. I used Evergreen Styrene strips to reinforce the sides of the car. Here is what the bracing  looked like. The lower bracing was carefully placed so as to be camouflaged by the Grandt Line doors.


I decided to reuse the original platform/deck of the car rather than scratch build a new one. Even though this meant steel rather than wood pedestal beams and using trucks from a later time period, since it was under the car I felt no one would notice and I could live with these compromises. I have become disinclined to model features that cannot be seen as I have gotten older. So, I cut the middle section out of the car deck using a razor saw. When sanded smooth, my measurements/skill set resulted in a car slightly shorter than intended so I spliced in a piece of my trusty Evergreen to compensate. I also used a scrap of styrene to reinforce the joint as seen below. In gluing the parts together, I used a straight edge to keep everything aligned. You will note that the scrap of styrene that I used looks like floor boards and so were they painted. Once the doors were on, I discovered I could just have easily used plain styrene painted black. LOL


Below you see the Evergreen filler, new needle beams, queen posts and truss rods in place. The hole spacing for the queen posts was based on the spacing of the holes for the original truss rods.
 

For the roof, I made a base of styrene to fit inside the open top and glued it in. I then slowly sanded this base to match the profile curves on each end of the car. Next, a piece of plain 0.01" Evergreen Styrene larger than this base was glued to this base. This was followed by a scale 3' wide piece of 0.005 styrene glued so as to run down the center of the car from end to end simulating a canvass roof. Finally, I trimmed this canvas roof so that it overhung the sides and ends of the car by a nominal scale 1". I will discuss how I made the roof walk in a future posting. Tichy Train offers a set of roof walk supports that are much easier to use than what I went through. Even though they are intended for a peaked rather than an arched roof, by the time they are glued in place, you can't tell the difference. They also, believe me from hours of experience, save a LOT of time and frustration.

Here are some images of the finished car. I spray painted the car Floquil roof brown (It may have been Polyscale roof brown, I just can't remember at this point. Make sure you keep a record of your modeling.). Once this base coat dried, I brush painted the trucks, canvas roof, and hardware Floquil/Polyscale grimy black. The wheels are from the now defunct Reboxx company. The decals were applied letter by letter using a Champ alphabet decal set (except for the "No" which came from a Microscale USMRR rolling stock decal set). If you look closely, you will see the car mysteriously changes from number 26 to number 36. This is the result of 2 things. First, the Delaware Central uses a unique number for each piece of it's rolling stock. That means it cannot have a, lets say, ventilated box car number 26 and a flat car also numbered 26. Second, a decade plus after completing this car I accidently numbered a flat car as number 26 and it was easier to change the 2 to a 3 on this ventilated box car. Laughing at myself profusely now (though not at the time I discovered the error).

Before & after comparisons:


After uploading the above images, I noticed several discrepancies between the models pictured and my description of how I did it. First, the wheels you see on the finished car have been upgraded since this photo was taken. The new wheels are Reboxx code 88 while the wheels above are a code 100. I think cars look better with the Reboxx narrower tread and they run splendidly. Also, the brake wheel above is the one that comes with the Tichy Train brake wheel sets. It has been subsequently replaced with the BTS brake wheel found in the description.

The car on a diorama I built as originally finished:


The car in a train on my friend, Thom's, layout:


The cell phone photos I took of the car as it exists today:


In a future post I will discuss how I made some of the details for this car such as the end beam details, ladders, grab irons, brake wheel platforms and assemblies.